This post is part of a series of educational articles on gardening, self-sufficiency and food independence. That’s what The Liberty Garden is all about. To find out more about the mission behind The Liberty Garden concept, go here. Or read all the archives.
I love it when people ask me how to establish a landscape or garden. It gives me the opportunity to help at the ground level and advise them on proper soil preparation. My advice? Add compost.
What is compost?
Technically speaking, composting is a process that results in a product called humus. This happens through the microbial decomposition of organic material into a nutrient-rich and fertile soil amendment. Not only does compost provide innumerable benefits to your plants and landscape, it’s also free to make and reduces the amount of green waste sent to the local landfill.
Many people have the misconception that composting is messy, smelly and attracts vermin. This is not true. When done correctly, composting is easy and results in vigorous plants and bountiful garden crops. It is probably the most valuable thing you can do for your yard.
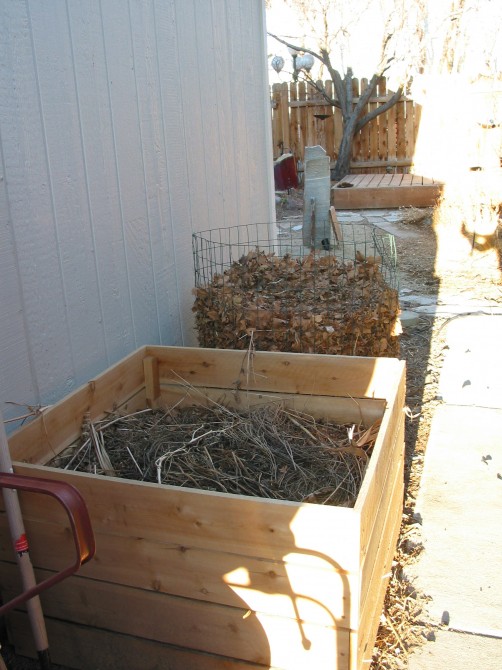
Two very tidy composting systems. The one on the far right is a “let it rot” system of just leaves raked-up in the fall. These leaves can be used as “brown” material in the summer when everything seems to be green. The wooden box is a simple and elegant container from the California Master Gardener handbook (view design plans). It comes apart to make turning the pile easier.
The basic compost recipe is equal parts of green material and brown material, plus a little soil, water and air. Green material includes fresh organic waste, such as grass clippings, deadheaded flowers and kitchen scraps. Brown material is dried or dead organic waste, such as fallen leaves, dried grass, pruned wood, shredded newspaper or cardboard. Never add meat scraps, pet waste, weeds with seeds, or diseased materials to your compost pile. All materials you add should be less than 2 inches in size so that it will break down quickly.
Where to put it?
Select a location for your compost pile that is tucked away somewhere in your yard, or simply build it where you eventually want to build your garden. Make sure the area you select gets about six hours of sunlight each day. You can heap all of the material together in a loose pile, construct a simple bin, or purchase a commercially made compost bin.
Composting 101
Once you have found a place for your composting venture, it’s time to pile up your green and brown materials. It should be at least 3 feet to 4 feet square. About every foot, add an inch or two of soil, which will supply microbes to decompose the organic matter. Add water as you go. The microbes need water and air in order to get to work, so keep the compost pile wet, but not soggy. It should be about as damp as a wrung-out sponge. If it is too wet, the process will switch from aerobic to anaerobic decomposition, and the pile WILL smell.
Air is the final ingredient and is added to the recipe by turning your pile. Let the pile sit for about two days and then check the temperature. You can poke your hand into the middle of the pile, or use a thermometer. Once the internal temperature is about 160 F, it is time to turn it. This will aerate the pile, but decrease the temperature. Continue to monitor the heat, and turn the pile again when it reaches 160 F. If you continue turning the pile every time it heats back up to 160 F, you should have usable humus in about two or three weeks. It is important to not add any new materials if you are actively turning your pile.
Alternatively, you can just leave the pile sit, and not turn it. The composting will still take place, but much more passively. It will take more time – sometime up to a year – but will not require as much effort by you. Either way, you will enjoy seeing your plants thrive as your compost does its magic in your soil.


Leslie,
Is it natural for a person to find Crossfit with so much enthusiasm, then find out about the Zone diet, then realize that Paleo is the correct approach, then move into the realm of growing your own food in a sustainable environment?
And to find it all here at Robb’s site!
I started my compost bins last year and I have two of the chicken wire bins coooking away. I love the design for the wooden box. I have been thinking about making a compost bin with used wooden pallets but I like this design better and it looks pretty cheap to make.
Thanks for the great post.
Good Gardening,
Tom
Hi Tom,
Glad you enjoyed the post! Your journey to sustainable food via CrossFit, the Zone and Paleo sounds like mine and so many others. Yes, it is fantastic that Robb offers so much great info!
I found the wooden box design to be the simplest and easy to use. You can build it out of wooden pallets, old fence pieces, etc.
Make one extra frame and place it next to your completed and filled compost bin. This makes it easier to turn your pile into the new space.
Happy composting,
Leslie
For readers who use the metric system:
160 degrees Fahrenheit is about 70 degress Celsius. 2 inch is about 5 centimeters and 3-4 feet is 90-120 centimeters.
Good post. Too bad I live in a small apartment … not sure the landlord would be keen on me composting across the little swatch of grass outside. XD
Well, might just stick with a window herb garden.
Indeed. Some oregano and basil are hanging out in a pot outside my window right now. My roommate had never planted anything in her life before last week!
If you don’t mind the idea you can use vermiculture, which is composting with worms. You can look up a lot of online projects where people used plastic bins to hold their slimy little friends. They create fantastic fertilizer and compost but it does bring back a creepy reminder of the movie Dumb and Dumber.
Wow! I LOVE the design of that compost bin. It looks like something that I could do as well. I wonder, would that design also work for the Square Foot gardening system as well? I am a clutz when it comes to tools, that is for sure!
I’ve had a couple of compost piles going in a back corner of my garden for quite a few years, but they are rather slow because I don’t really tend to them enough and they never really get cooking.
What I really like for both speed and ease of use, however, is composting via red wiggler worm bins, or vermiculture. I have 2 worm bins going and am thinking about adding a 3rd bin. I’ve tried homemade worm bins, but now prefer the Wriggly Wranch Worm system. I’ve been able to buy the worm bin systems at significantly reduced cost (less than half price) thanks to a city subsidized program for residents (San Diego area).
The worm castings (worm poop) and worm casting “tea” that I collect in empty milk jugs from the drainage spigots is like black gold nutrition for my garden and container plantings – plants love it, especially edible plants. I add fruit and vegetable kitchen scraps, coffee grinds, used tea leaves/bags, and some torn newspaper strips (for worm bedding) to the top bin, and the worms pretty much do the rest, eating it all up and converting it into a rich fertilizer. The most effort is in rotating the now heavy bins a couple times a year when the top bin becomes too full to add more scraps. I harvest the castings from the bottom bin at that time and distribute them around the garden or store in another tub for future use.
Bags of worm castings sell for big bucks at garden centers, but are practically free to make at home once a bin system and red wiggler worms are set up in some bedding (newspaper strips or coconut coir) with kitchen scraps added. It’s a great science/nature project for kids, too.
Vermicomposting is AWESOME! Look for a future post on it. It’s a great solution for a small space becasue you can keep the composter inside! Plus, as a good Paleo eater it’s a great way to recycle your vegetable scraps and reduce your carbon footprint. An excellent and informative book is Worms Eat my Garbage by Mary Appelhof.
I am the publisher of Rodale’s Organic Gardening Magazine. I am also a Crossfitter and Paleo eater!
So great to see this post on Rob’s site. I too believe that Gardening can change the world one family at a time.
J.I. Rodale (our founder) was the guy who coined the term “organic” and was the pioneer of the movement in the United States. Our magazine is 70 years old, but is experiencing a re-birth as our culture gravitates towards this movement.
I truly believe that gardening (and eating Organically) are foundational to health.
check out http://www.organicgardening.com
Great work, and thanks for the post!
Jeff! That is so cool. If you’d ever like to contribute here and pimp the magazine I’d absolutely love it.
Robb,
Great to hear from you. Not sure if you realize it but Rodale is the same company that publishes Men’s Health Magazine. We also published Cordaine’s recent book Paleo for Athletes as well as De Vany’s New Evolution Diet.
I am reading your book right now and absolutely love it.
I would very much like to contribute to what you are doing any way that you see fit. Obviously, my passion and mission is around the importance of an organic food system for our health.
I speak nationwide on the topic as well as write, etc.
can we talk off line? I am at [email protected]
Jeff
excellence!
I come from China!
I too have found the Rodale series and I’m so glad I did.
My only concern is when I inquired about horse manure it got me thinking about different chemicals that might be in the items we compost. Will those chemicals eventually leach out of the compost bin?